
So you’re looking to set up a new website. You’ve got a good idea of what your site will be about, what content you’ll have on it, whether you’ll be selling anything, the list goes on. Now to get started with WordPress!
It seems like you’re all ready to begin, right? But wait, what about your platform? If you’re reading this, you’ve probably chosen – or are considering choosing – WordPress. But perhaps you aren’t sure how to begin. Or maybe you just need a refresher on how it works. This article will help make the process easier by taking you step by step on how to get started with your WordPress site.
Please note: there are big differences between WordPress.com vs. WordPress.org, in this guide we’ll be sharing tips for .ORG specifically.
Step 1: Find the Best Hosting for Your Site
Before you can use WordPress.org you need a hosting service. You can set up your own server and install WordPress on your computer, but when you’re just starting out it’s easier to subscribe to a service that already has servers set up and ready to host a WordPress site. Some services are free, and some are paid; we recommend using a paid one, as they will provide higher quality services and features.
Not sure which type of hosting or which host to choose? We completely understand (and we’ve been there before, WPExplorer has switched hosts a couple times before finding a perfect fit). There are a few different types of hosting to consider, all with their own pros and cons. You can read our guide on the best WordPress hosting, or take a look at our handy infographic showcasing the top hosting options we’d recommend to new WordPress users.
WordPress Hosting Options
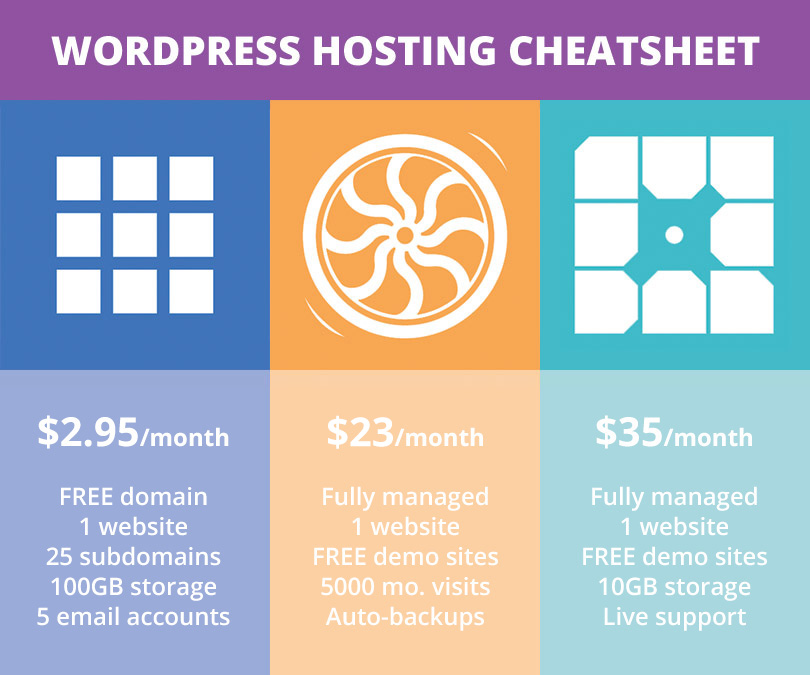
Shared Hosting is what most new WordPress users start with. It’s an easy budget-friendly option that has enough resources to host a new website. Most shared hosts offer one-click WordPress installation, a reasonable amount of storage & bandwidth and sometimes a few perks (like Google Adwords coupons or even a free domain name). In our opinion the best shared hosting plan is from Bluehost. Starting at just $2.95 per month (with our special link) it’s a great option for those just starting out with WordPress.
BLUEHOST SHARED WORDPRESS HOSTING
Managed VPS (which stands for Virtual Private Servers) is a step up from shared hosting. You still share a server with other users, but the server is partitioned into sections so you each have your own mini server for better security, privacy and website operation. Plus, with managed VPS you don’t have to maintain your server – the hosting company handles software updates and code WordPress updates for you so you can focus on your website. Our pick for the best managed VPS is Flywheel. They offer fantastic services like free migrations, built-in caching, automated backups and more giving you a lot of bang for your buck.
FLYWHEEL VPS WORDPRESS HOSTING
And the last hosting option is Managed WordPress Hosting, which is when the hosting company fully manages your server for you. Managed hosting offers more features and website resources than shared, and many managed hosts will offer scalable hosting plans so you can start small and upgrade your server as your business grows. We’ve used managed hosting from WP Engine for years and are extremely happy with the quality of our hosting as well as the awesome service from their support team. They offer a great personal plan for new bloggers, as well as amazing premium & enterprise level plans for high traffic websites.
WP ENGINE MANAGED WORDPRESS HOSTING
Step 2: Choose a Domain Name
You probably already have your website name, or a shortlist of names, picked out. That’s great! If you don’t, there are plenty of articles that can help you brainstorm ideas. Just keep in mind your domain name should reflect the purpose of your site and be interesting enough to draw visitors.
The other part of naming that gets somewhat less attention is the domain name. In technical terms, a domain name is the part of a URL that identifies IP addresses (which identify computers or devices on a network) and web pages. More simply, it’s your web address. Every domain name has a suffix, such as .com or .org. You can register any domain name you like that isn’t already taken – for an annual fee. Some hosts will give you a free domain registration for the first year. As part of the sign-up process hosts will also automatically check to see if the domain is available for you to use. But you can always purchase a domain name directly from a registrar like NameCheap or GoDaddy.
After you’ve settled on a domain name, follow your hosting company’s instructions for completing the setup process. You’ll probably need to point your domain name to your host. Just check their online docs or do a quick Google search to find specific instructions. Now the real work begins!
The next steps don’t necessarily have to happen in a particular order. You can now access your dashboard and turn your attention to whatever you feel is most pressing.
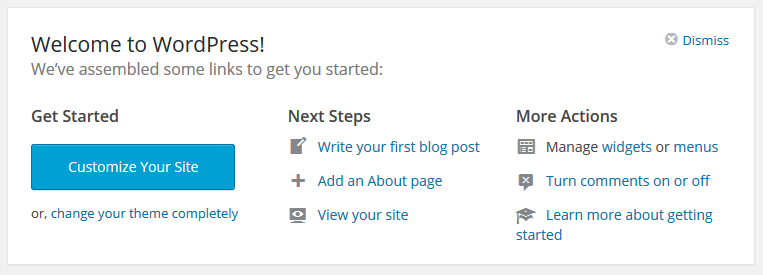
At this point it can be helpful to view your site and have a look through your admin options. This way you know what you have to work with.
Step 3: Customize Your Site Design
WordPress defaults to a particular theme which you can stick with as-is, customize or change it to a new theme.
Free Themes
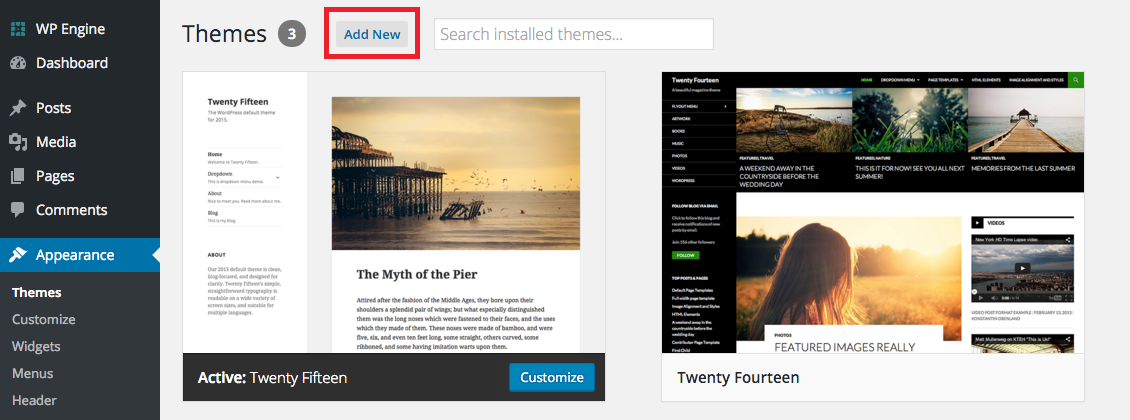
WordPress has several pre-installed themes to choose from. To see the directory of free WordPress themes, click on Appearance > Themes. If you click the Add New button you’ll see a list of free WordPress themes from the WordPress.org directory along with details about the themes, and the option preview or install them.
You can also choose to install a theme developed by a third party. Many reputable sites offer free WordPress themes – WPExplorer included. Installation is a bit different as you’ll need to download the theme. Often this is a .zip with the name of the theme. To install simply go to the theme directory and click Upload Theme.
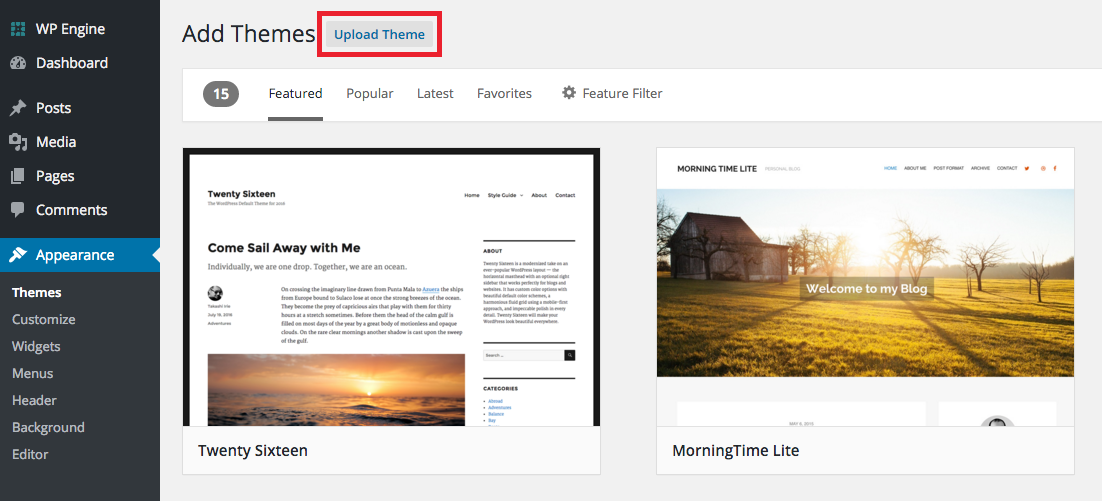
The next screen should prompt you to browse for the theme on your computer. Select your theme file (the .zip we mentioned) and click to install. All that’s left is to click activate in order to use your new theme on your site.
Premium Themes
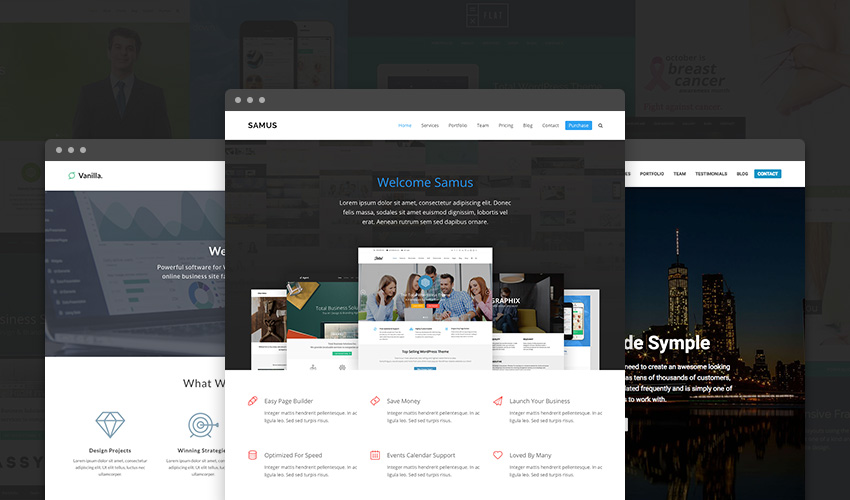
While free themes are a great way to get started, premium (or paid for) themes are the gold standard. Third party premium themes offer more variety and often include many more features than the themes you’ll find in the free theme directory.
For example, the Total WordPress theme includes an easy to use visual page builder, built-in options for your porfolio, a customizable blog, custom fonts, unlimited color options and tons more. But most importantly it includes an easy demo importer you can use to import any of the theme’s live demos. So with jsut a few clicks you can have your site design started.
VIEW THE DEMOLEARN MORE & DOWNLOAD
But that’s just one option. There are many premium theme marketplaces where you can purchase a new theme for your website. Themeforest is a good place to start to find a premium theme, with over 11,000 themes to choose from. Or you can browse the many theme collections we’ve put together here at WPExplorer.
After you’ve found, purchased and downloaded the theme you want you’ll need to install it (just like we covered in the free themes section). Head over to Themes > Add New to upload, install and activate. If your premium theme included any bundled plugins you may see additional prompts or notices to install recommended plugins.
Theme Customizer
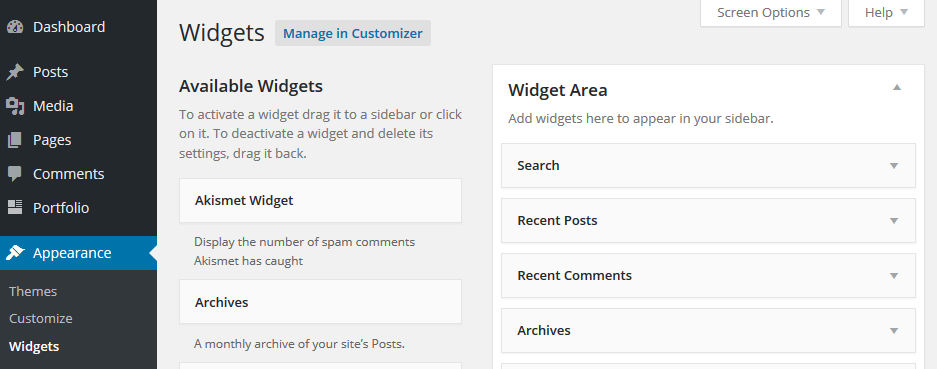
Other parts of your appearance that you’ll want to customize are the widgets, menu(s), header and background. These can all be changed using the theme customizer which you can find under Appearance (just below the themes option). Click on it to open up the love WordPress customizer:

WordPress comes preloaded with a number of widgets, some of which are activated and appear in your site’s sidebar. You can rearrange them as necessary, and if you want more you can always install a plugin to add new ones.
Your theme may support different or multiple menu locations (main, top bar, footer, etc). If it doesn’t, menu plugins are available for installation. You probably won’t need to worry too much about this though until you have several pages set up.